Teriyaki Chicken and Rice Casserole
This teriyaki chicken and rice casserole is the cozy, no-stress version of everyone’s favorite takeout flavor. You get juicy chicken, tender veggies, fluffy rice, and a glossy sweet-salty teriyaki sauce baked together in one dish — no wok, no standing at the stove. It was made for busy nights, school lunches, and “I should meal prep but I also want something tasty” kind of days. The flavor leans classic teriyaki (soy, garlic, ginger, a little sweetness), but you control the salt and sugar, so it’s lighter than takeout. Keep this one on rotation and you’ll always have a crowd-pleasing pan of food ready.
Why You’ll Love This Recipe
You know what? The best dinners are the ones you don’t have to think about. This is one of them.
- 1-dish convenience: Protein, carbs, and veggies all in the same pan. No second pot of rice. No skillet on the side. Just bake and serve.
- Meal-prep friendly: Holds well 4–5 days in the fridge because the sauce keeps the rice from drying out.
- Family-approved flavor: Teriyaki is that “safe” flavor — sweet, savory, familiar. Kids eat it, adults eat it, nobody complains.
- Flexible ingredients: Fresh broccoli? Use it. Frozen stir-fry mix? Also fine. Leftover rice? Even better.
- Lighter than takeout: You’re using low-sodium soy and real ginger/garlic, so it tastes fresher and cleaner.
- Naturally dairy-free: And easy to make gluten-free with tamari.
Ingredients
Here’s the thing: the ingredient list looks a bit long, but most of it is pantry stuff. And once you’ve made the sauce once, you’ll reuse it for stir-fries.
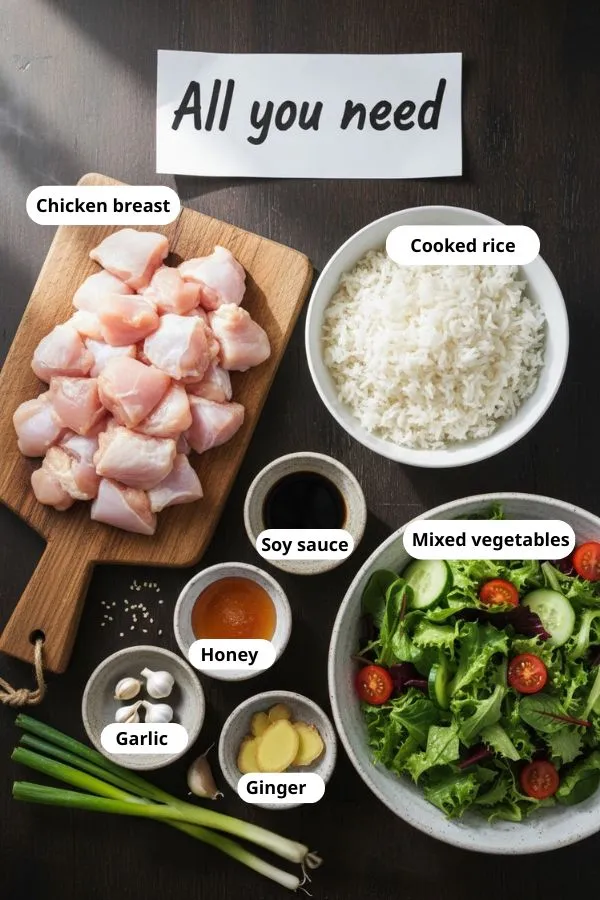
Main Components
- Chicken
- 1–1.5 lbs boneless skinless chicken breasts or thighs
- Cut into bite-size pieces, or bake whole and shred for extra tenderness
- Thighs = juicier, more forgiving
- Breasts = leaner, still great
- Rice
- 3 cups cooked rice (day-old rice is best so it doesn’t get mushy)
- White, jasmine, or brown rice; brown may need a splash more sauce
- Leftover takeout rice totally works
- Vegetables
- 2–3 cups mixed veggies: broccoli florets, carrots, peas, edamame, bell pepper, or a frozen stir-fry mix
- If using fresh, microwave/steam 1–2 minutes so they finish at the same time as the chicken
Homemade Teriyaki Sauce
- 1/2 cup low-sodium soy sauce (or tamari for gluten-free)
- 1/4 cup water or chicken broth
- 2–3 tbsp brown sugar
- 1–2 tbsp honey (gives that glossy finish)
- 1–2 tsp minced garlic
- 1 tsp grated ginger
- 1–2 tsp rice vinegar (for brightness)
- 1–2 tsp sesame oil (optional but lovely)
- 1–2 tbsp cornstarch + 2 tbsp water (slurry) to thicken
Why homemade? Because some bottled teriyaki sauces are too sweet and too thin — and a thin sauce disappears in a casserole. This one stays.
Garnishes / Finishing
- Sliced green onions
- Toasted sesame seeds
- Reserved 2–3 tbsp teriyaki for drizzling after baking
Substitutions & Variations
- Protein swaps: leftover rotisserie chicken, turkey, or pressed tofu
- Rice swaps: quinoa or cauliflower rice (add cauli rice later so it doesn’t overcook)
- Sauce shortcut: store-bought teriyaki, but simmer it 1–2 minutes to thicken
- Make it spicy: sriracha, red pepper flakes, or chili crisp on top
Step-by-step Instructions
You’ve got two ways to handle the chicken: bake-then-shred (more tender) or toss in cooked chicken (faster). I’ll explain both.
Step-by-Step Method
- Preheat & prep
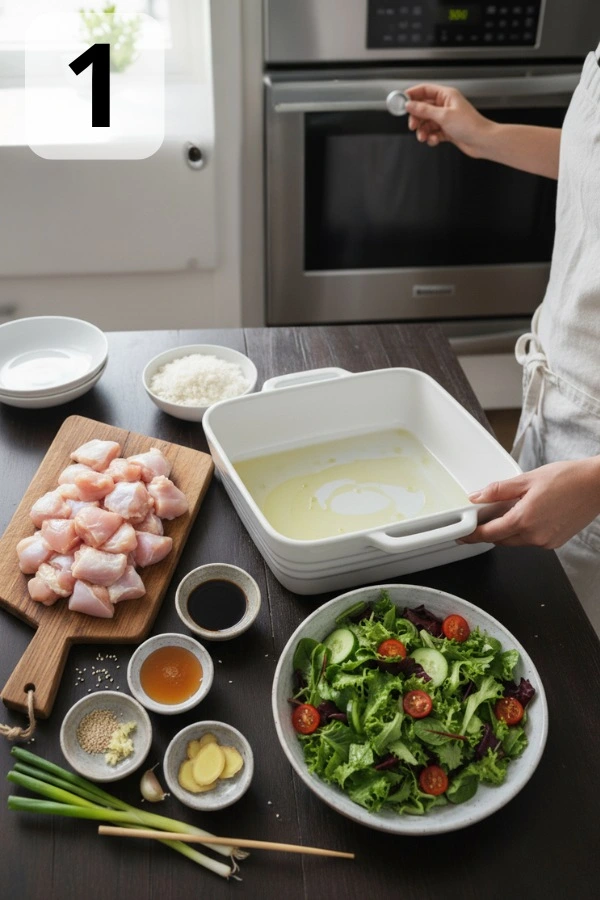
- Preheat oven to 350°F (175°C).
- Grease a 9×13-inch baking dish.
- Make the teriyaki sauce
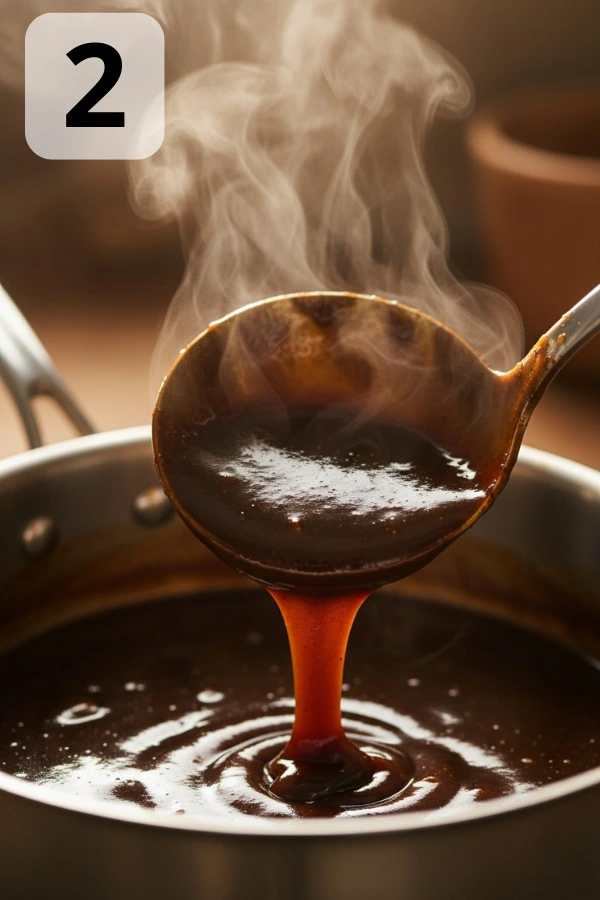
- In a saucepan, whisk soy sauce, water/broth, brown sugar, honey, garlic, ginger, and rice vinegar.
- Bring to a gentle simmer.
- Stir in cornstarch slurry and cook 1–2 minutes until glossy and slightly thick.
- Turn off heat. Reserve 2–3 tbsp for finishing
- Cook or prep the chicken
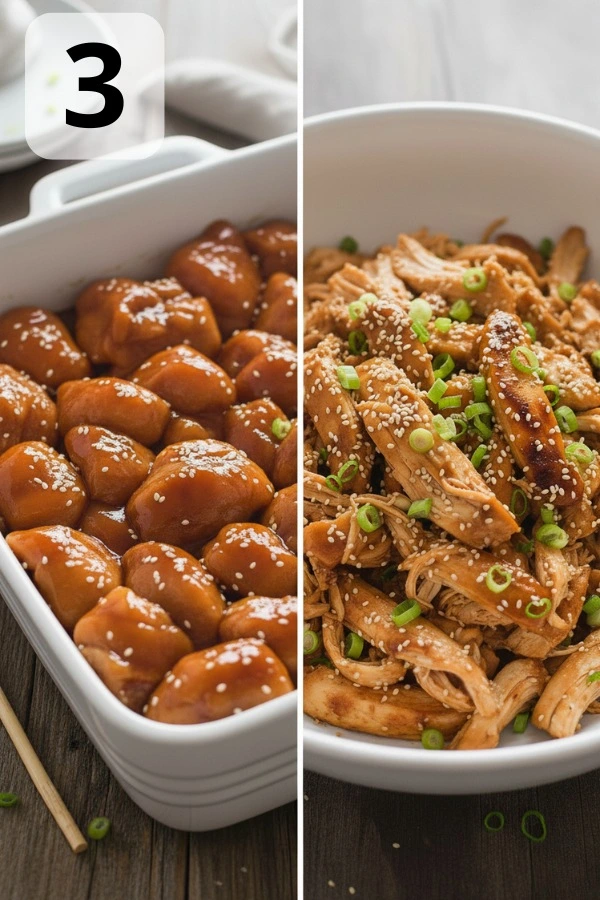
- Option A (baked-shred, extra tender):
- Lay raw chicken breasts/thighs in the baking dish.
- Pour 1/3 of the teriyaki sauce over.
- Cover and bake 20–25 minutes until cooked.
- Remove, shred or chop, return to dish.
- Option B (fastest):
- Use already cooked/shredded chicken or rotisserie.
- Skip extra baking time.
- Assemble the casserole
- Add 3 cups cooked rice to the baking dish.
- Add 2–3 cups vegetables (frozen can go straight in).
- Add the cooked/shredded chicken.
- Pour the rest of the teriyaki sauce over and toss to coat. The mixture should look moist — rice will drink some up.
- Keep the reserved 2–3 tbsp sauce for later.
- Bake
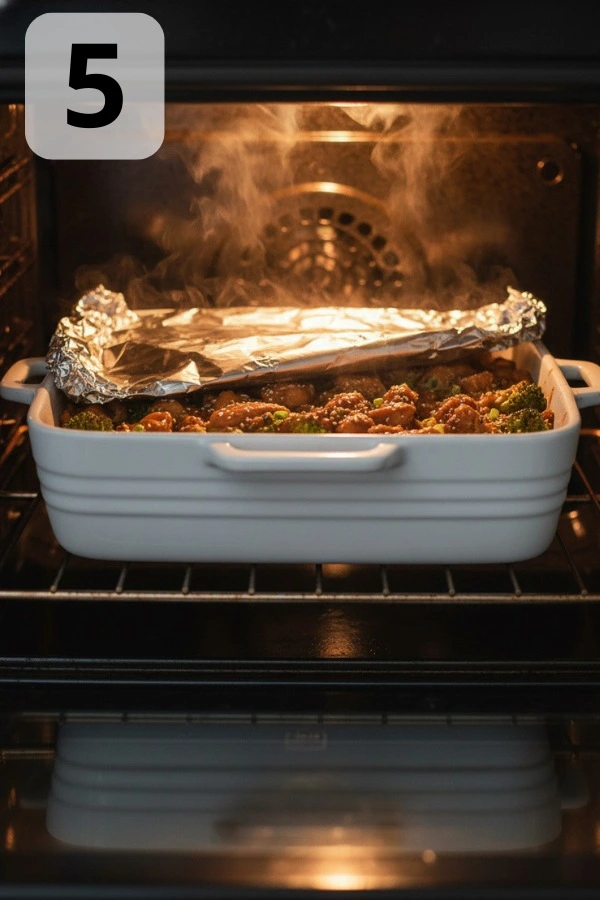
- Cover with foil and bake 20–25 minutes until heated through and bubbling at the edges.
- Uncover for the last 5 minutes so the top looks shiny, not steamed.
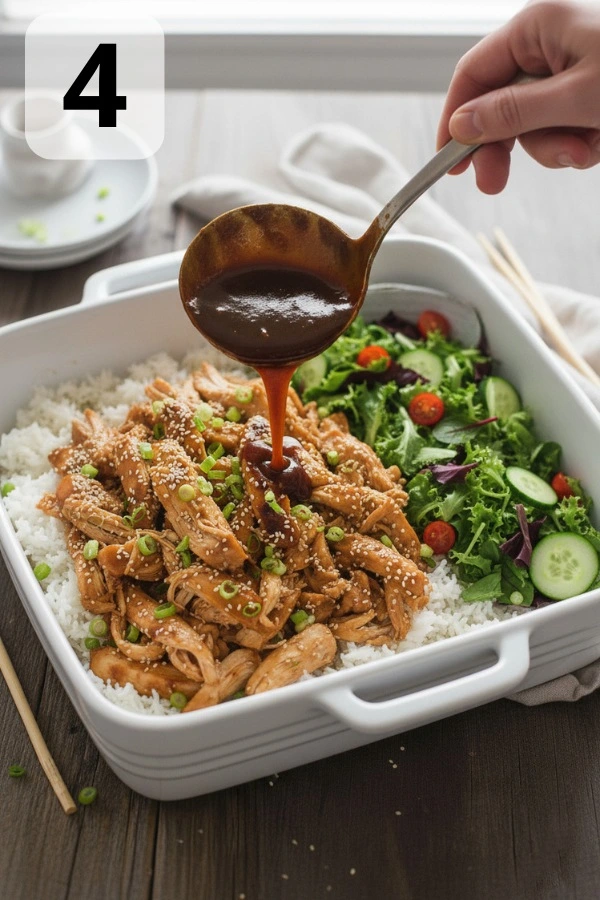
- Finish & serve

- Drizzle the reserved teriyaki over the top.
- Sprinkle green onions and sesame seeds.
- Serve hot right from the dish.
Common Issues and Their Solutions
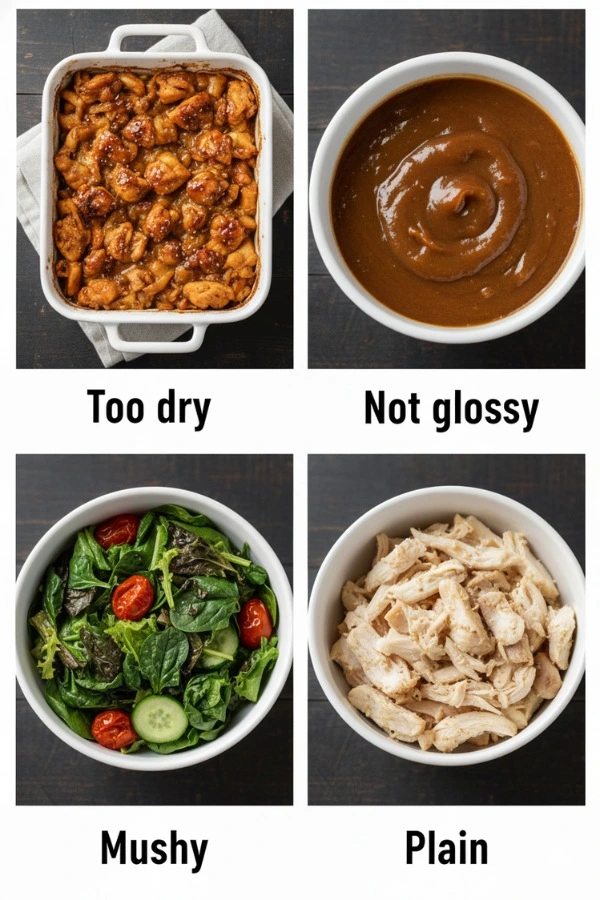
- “My casserole was dry.”
- Likely too much rice or overbaking.
- Fix: pour in 1/4–1/2 cup broth, cover, bake 5–10 minutes.
- “My sauce wasn’t glossy.”
- You may have skipped the cornstarch or didn’t simmer.
- Fix: make a quick slurry and bake again a few minutes.
- “Veggies got mushy.”
- Frozen veggies were fully thawed.
- Fix: add them frozen next time and uncover at the end.
- “Chicken tasted plain.”
- It didn’t get coated.
- Fix: toss chicken in some of the sauce before mixing and drizzle extra on top after baking.
- “It didn’t reheat evenly.”
Stir halfway and add a splash of water.
Best Tips for Success
Let me explain a few small things that make a big difference:
- Use day-old rice: Slightly dry rice separates better and doesn’t turn into a block.
- Keep it saucy: Casseroles lose moisture as they bake. If your mixture looks dry before baking, add 2–4 tbsp broth.
- Par-cook harder veggies: Broccoli stems, big carrot slices, or green beans like 1–2 minutes in the microwave first.
- Even chicken = even cooking: If some pieces are big and some small, the small ones can dry out.
- Flavor boosters: A squeeze of lime, a drizzle of chili oil, or a spoon of garlic-chili crisp wakes it right up.
- Beginner note: Don’t skip the cornstarch slurry — that’s how you get that restaurant-style glossy finish.
- Advanced note: Want it more “teriyaki-teriyaki”? Make the sauce with a splash of mirin and simmer longer.
Storage & Leftover Notes
Good news: this is actually better the next day.
- Fridge: Store in an airtight container for 4–5 days.
- Reheat (microwave): 1–2 minutes with a splash of water or broth, cover so it steams.
- Reheat (oven): 350°F, covered, 15–20 minutes, again with a little liquid.
- Freeze: You can freeze after baking for up to 2 months. Thaw overnight, reheat covered.
- Meal prep: Portion into 4–6 containers and add something green on the side (edamame, cucumber salad, even orange slices).
What to Serve With It
This dish is pretty complete, but if you want to build it into a fuller meal:
- Light sides: cucumber salad with rice vinegar, sesame slaw, miso soup
- More carbs for kids: steamed rice, dinner rolls
- Drinks: iced green tea, sparkling water with lime, or a light white wine
- Easy dessert: fresh pineapple, fruit salad with honey-lime dressing, or mochi
FAQs
- Can I make this ahead?
Yes. Assemble the casserole, cover, and refrigerate up to 24 hours. When baking from cold, add 5 extra minutes.
- Can I use store-bought teriyaki?
Sure. Just make sure it’s not super thin. If it is, simmer it with 1 tsp cornstarch + 2 tsp water.
- Can I use raw rice?
Not for this exact version — this one is calibrated for cooked rice. For raw rice, you need more liquid and more time.
- Is this spicy?
Nope. It’s sweet-savory. Add heat if you like.
- Can I use frozen veggies?
Yes, that’s actually the easiest way. Just don’t thaw all the way.
- How do I keep rice from getting mushy?
Use day-old rice and don’t overbake.
Nutrition Info (Approx.)
- Calories: ~350–420 per serving (6–8 servings)
- Protein: 25–30g
- Carbs: 40–50g
- Fat: 8–12g
- Sodium: depends on the soy — tell readers to use low-sodium
This makes it a strong weeknight meal: protein, veggies, and comfort in one go.
Quick Recipe Card
- Prep time: 15 minutes
- Cook time: 40–45 minutes
- Total time: about 1 hour
- Servings: 6–8
Ingredients
- 1–1.5 lbs chicken
- 3 cups cooked rice
- 2–3 cups mixed vegetables
- Homemade teriyaki sauce (as above)
- Green onions, sesame seeds
Instructions
- Make sauce.
- Add chicken, rice, veggies to dish.
- Pour sauce, toss to coat.
- Cover and bake 20–25 minutes at 350°F.
- Uncover 5 minutes.
- Finish with toppings and serve.
Notes: make-ahead friendly, gluten-free with tamari, freezer-friendly, great for meal prep.
The Bottom Line
If you’re the kind of cook who wants dinner to be tasty, practical, and not a 12-step production, this teriyaki chicken and rice casserole checks every box. It gives you takeout flavor without takeout cost, it sneaks in veggies without a fight, and it reheats like a champ — which is exactly what busy weeks need. The real secret is keeping it saucy and using day-old rice; do those two things and this becomes one of those “I can make this anytime” recipes. Save it, print it, and don’t be afraid to tweak the veggies or add pineapple. Recipes like this should work for you, not the other way around.

| Servings |
|
Ingredients
- 1 lbs –1.5chicken
- 3 cups cooked rice
- 2 cups –3mixed vegetables
- Homemade teriyaki sauce as above
- Green onions sesame seeds
Ingredients
|
|
Instructions
- Step 1: Preheat & prep: Preheat oven to 350°F (175°C). Grease a 9x13-inch baking dish.

- Step 2: Make the teriyaki sauce: In a saucepan, whisk soy sauce, water/broth, brown sugar, honey, garlic, ginger, and rice vinegar. Bring to a gentle simmer. Stir in cornstarch slurry and cook 1–2 minutes until glossy and slightly thick. Turn off heat. Reserve 2–3 tbsp for finishing.
- Step 3: Cook or prep the chicken: Option A (baked-shred, extra tender): Lay raw chicken breasts/thighs in the baking dish. Pour 1/3 of the teriyaki sauce over. Cover and bake 20–25 minutes until cooked. Remove, shred or chop, return to dish. Option B (fastest): Use already cooked/shredded chicken or rotisserie. Skip extra baking time.
- Step 4: Assemble the casserole: Add 3 cups cooked rice to the baking dish. Add 2–3 cups vegetables (frozen can go straight in). Add the cooked/shredded chicken. Pour the rest of the teriyaki sauce over and toss to coat. The mixture should look moist — rice will drink some up. Keep the reserved 2–3 tbsp sauce for later.
- Step 5: Bake: Cover with foil and bake 20–25 minutes until heated through and bubbling at the edges. Uncover for the last 5 minutes so the top looks shiny, not steamed.
- Step 6: Finish & serve: Drizzle the reserved teriyaki over the top. Sprinkle green onions and sesame seeds. Serve hot right from the dish.


